
Google Classroom is gaining popularity as an online Learning Management System (LMS) and with the suite of free tools that comes with Google for Education, it is worthwhile knowing about. This article will have an in-depth look at everything you will need to know.
Here is what you need to know about Google Classroom:
- How to Get Started
- Terms and Conditions
- Type of Registration
- Class Size Limits
- Using Google Classroom
- Sample Class Setup
- Step 1 – Registration Type
- Step 2 – Class Creation
- Step 3 – Adding Class Content
- Step 4 – Understanding Assessment
- Step 5 – Adding Students
- Step 6 – Communication
- Step 7 – Analysing Grades
- Advanced Topics
Now that you know what there is to learn lets get your started in creating your first Google Classroom for free.
How To Get Started
When you first start with Google Classroom as much as no-one likes reading the terms and conditions the important bit for you is to decide on the type of user that you are. Then you need to create an account of that type. So let’s look at this now.
Terms and Conditions
Google Classroom follows the default terms of service policy of Google which you can find located here: Google Terms of Service – Privacy & Terms
The part of the terms of service we need to refer to is who can use Google Classroom and how you can use it. Most of the questions are answered here in this Google Classroom FAQ page. Classroom FAQ – Classroom Help
The most important section refers to what type of user you will be. This determines your level of access and the features you have available as well as how many classes and the class size you can have and when you need to pay for the service.
The two types of users are:
- Registered Institutions
- Personal account
Types of Registration
As per the terms of service, a teacher needs to clarify which type of user he/she will be. Different types of user accounts result in diversification of usability. We will discuss both the user types and help you decide.
Registered Institutions
Google allows two types of institutions to use Google Classroom and they are:
- Schools registered under G Suite for Education
- Personal Account
This translates to schools that have registered for G Suite for Education. When you create a class in Google Classroom, it will briefly prompt you to use your registered G Suite for Education account.
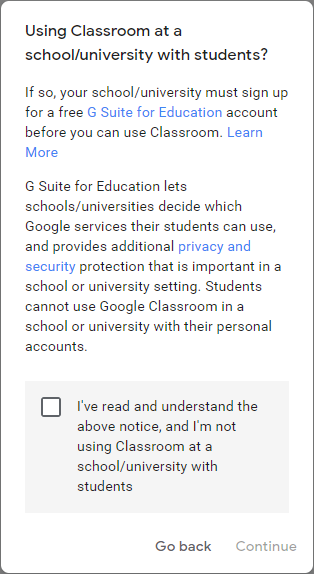
The terms of service don’t require students belonging to schools or the schools themselves to sign up for a G Suite for Education account.
Signing up a new institution is free. This sign up will allow the school administration to control which Google Services their students will use. Also, this will allow you to use additional Google Classroom features which are not available for personal accounts.
If your institution has already signed up for G Suite for Education, then you can use your institution’s email account to access Google Classroom.
Personal Account
You can use your personal Google Account to use Google Classroom. If you are a teacher teaching on your own outside of your school or just any other person teaching you can use a personal Google Classroom account.
LINK: Understanding Google Classroom Account Types
Class Size Limits
Before using Google Classroom a teacher must understand the class size limits. If your requirements are within the limits you can determine which type of user account is preferable to use for your classes.
According to Limits when using Classroom – Classroom Help, Google Classroom has these default limits on Registered accounts and Individual accounts.
| Activity or feature | G Suite or schoolaccount | Personal Google Account |
| Teachers per class | 20 | 20 |
| Class members (teachersand students) | 1,000 | 250 |
| Classes you can join | 1,000 | 100 maximum, 30 per day |
| Classes you can create | No limit | 30 per day |
| Class-member invitationsyou can send | 500 per day, per teacher | 100 per day, per teacher |
| Guardians per student | 20 | Feature not available |
| Email address visibility | No limit | Feature not available |
Note: You can invite more than 20 teachers, but only 20 teachers can join the class.
In short: using a personal account will give you fewer features. But if that is enough for your class you can use your personal account. Be careful of abiding by the terms of service.
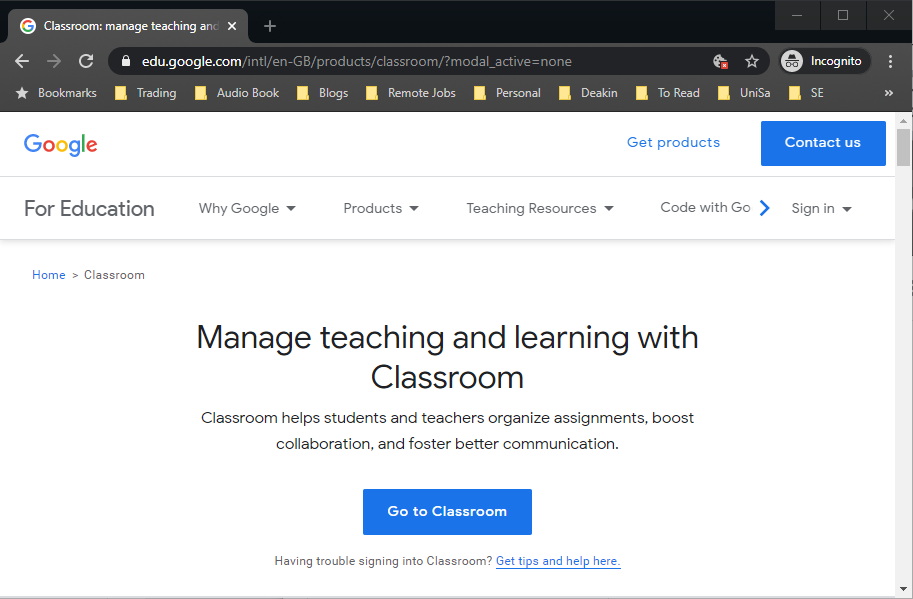
Overview of Google Classroom
Let’s introduce ourselves to the Google Classroom welcome page. Before starting your course in Google Classroom it is important to review all its features.
This is what it looks like when you visit https://classroom.google.com/
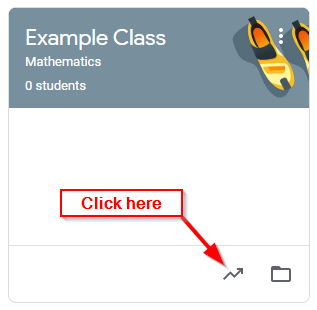
You will see all your Google Classes here on this page. You can go to view any class just by clicking on them. You can also quickly access the class grade sheet or the class drive folder from here as well with the icons at the bottom of the class box.
Click here to go to the Grades page of the class.
Click here to go to the Google Drive folder of the class
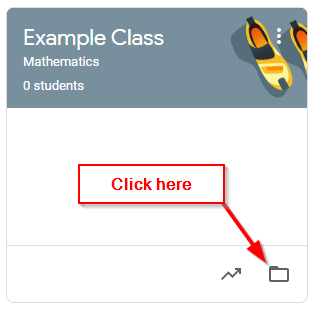
The drive folder and the Grade page will be discussed in greater detail later on the article.
There are some basic functionality needed to conduct a class or course online. Some of these basic functionality includes:
- Communication
- Assignment Management
- Grade Management
- Course Planning
- Exams
- Conducting Online Classes etc.
You can manage all of these options in Google Classroom with the tabs at the top of each class. To get to this you need to click on one of the classes on our welcome screen.
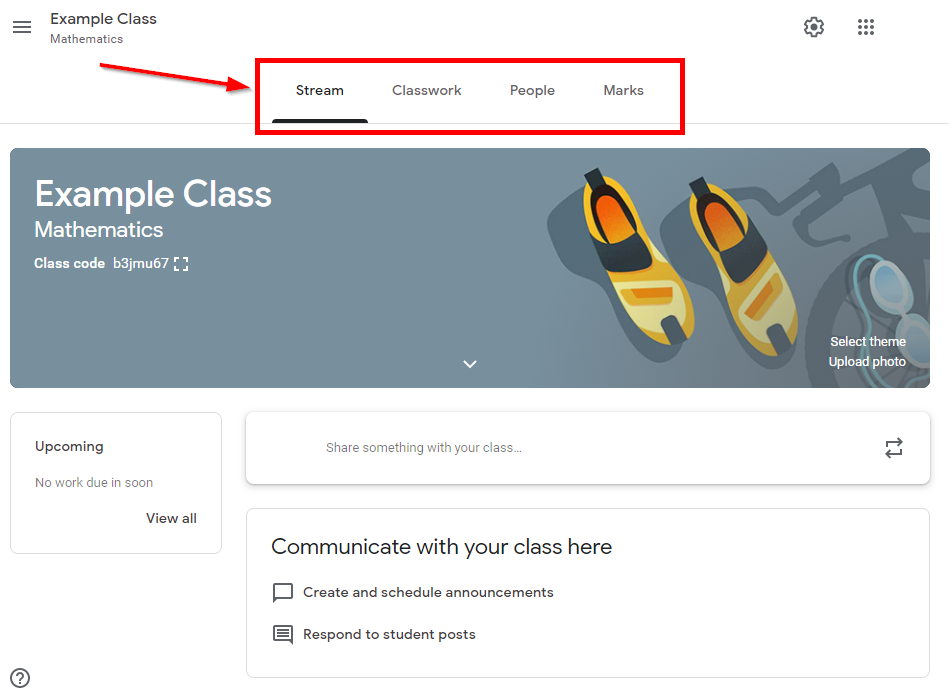
As you enter your class in Google Classroom, you will see four tabs marked above. They are designed to handle the basic functionality. We will discuss each section in greater detail later in the article.
The basic features of the pages are:
- Stream
Handles all the communication and announcements with Students - Classwork
Organizes the course content for your class as well as exams and assignments. - People
Where you can manage who has access to the class and review the participants’ information. - Grades
Manages all the grading and evaluation
Using Google Classroom
Now that you have had a quick overview of the basic layout of Google Classroom let’s dig in a little deeper and look at how we can use each of those features in detail. Let’s start with setting up your first class.
Things to consider when creating your first class:
- Class creation
- Course organization
- Communication
- Assignments and Tests
- Grade analysis
As we go through these 5 basic steps, we will use the features available in each of the four pages e.g. Stream, Classwork, People, and Grades.
Sample Class Setup
Suppose you as a teacher will take a Calculus course online with your students. You have 50 students in your class to teach.
Here is the example summary of your class:
- 50 students
- Subject: Calculus
- Chapters: 3
- Assignments: 10
- Quizzes: 5
- Online Class: 15
Now that we know what type of class we are trying to create let’s see how Google Classroom can help us set this class up.
Step 1: Registration Type
As we discussed earlier in the article this is where you will now decide on whether you will sign up as an Institution, or as a Personal Account. So go ahead and make this decision now.
If you are a school, university, or college the selection should be quite simple and if you are teaching people on your own outside of a business a personal account will do.
Step 2: Class Creation
When a new Class is created in Google Classroom a corresponding folder with the same name will be created in the teacher’s Google Drive. This is a shared folder that any student who participates in the class will also have access to.
How to create your first Class:
- Go to https://classroom.google.com/ and sign in.
- Click the + icon on the top right corner
- Select Create Class

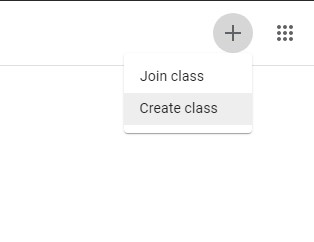
- Fill in class details and click Create
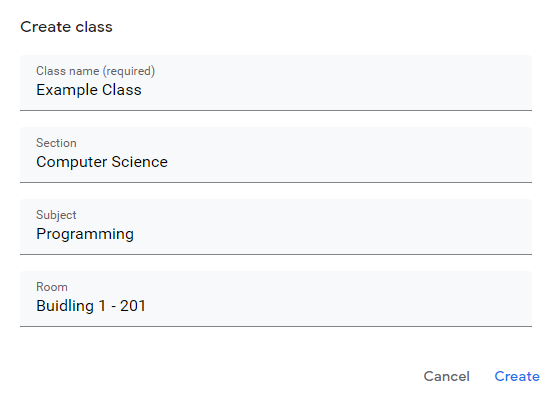
- Class Name
This field is mandatory. You will put in the name of your class here and make sure the name is unique as the student may enroll in different classes from one or many providers. - Section
A brief description of the course. - Subject
You can specify the subject that your class related to. - Room
You can also specify physical room numbers if you want.
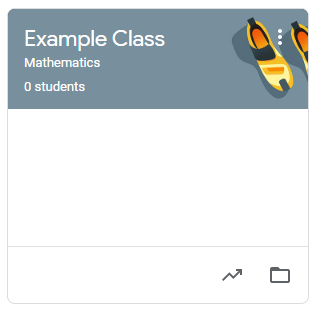
After creating a class you will be directed to the Stream page which is the start page for every class. Here you can see all the class details and edit the look and feel of your class theme.
Step 3: Adding Class Content
Adding Class Topics
The first thing you need to decide when you are adding Class content is how you will structure that content into Topics. Each topic that you create can have class content assigned to it. This is done in the Classwork page of your new Class.
Here is an example of our Calculus Class:
- Introduction to Calculus
- Definitions
- Limit
- Basic theorems, etc
- Differentiation
- Introduction
- Mathematical Techniques
- Limit
- d/dx
- Continuous differentiation
- Integration
- …
When assigning class materials to Topics you can use the following types of files:
- Google Docs
- Google Slides
- Google Forms
- PDF files
- Youtube videos
- Uploadable drive files
- Links to other websites and so on.
How to add Topics to your Class
- Go to Google Classroom and Sign In
- Select Your Class
- Click on the Classwork tab

- Add Class Topics
If you have a course textbook you could add the chapter topics of the book here to match the prescribed text. If you don’t you want to think about creating the content in an order that makes sense depending on the pedagogy you have chosen.
NOTE: Every time you add a topic it will be added to the top of the list of topics. If you want to you can move them around by left-clicking and holding with your mouse and dragging them around.
TIP: In case your topics get out of order maybe think about starting each topic name with a number so you know which order they are meant to be in. Also since Google Classroom does not support subtopics natively you can use these numbers to let students know if there is a subtopic. Eg. 2.1.1
Adding Class Materials to Topics
Now that you have your topics setup we can now start fleshing out our class with the content we will teach. While you are still on your Classwork tab or page in your Class you can start doing this now.
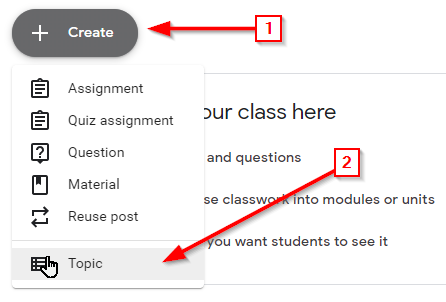
- Click Create and then Material
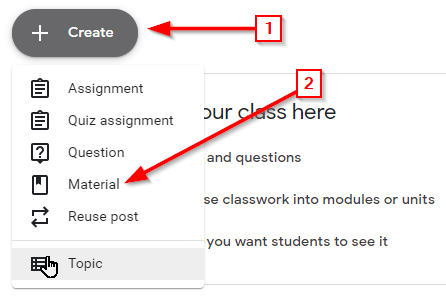
- GIve an appropriate Title and Description of the material
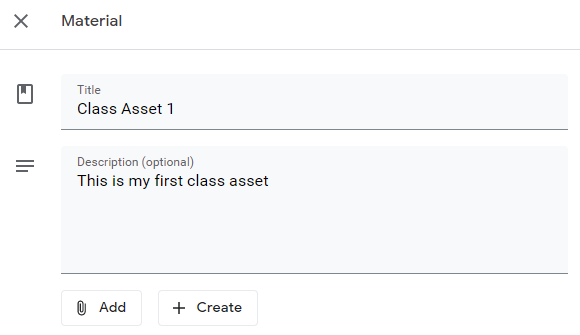
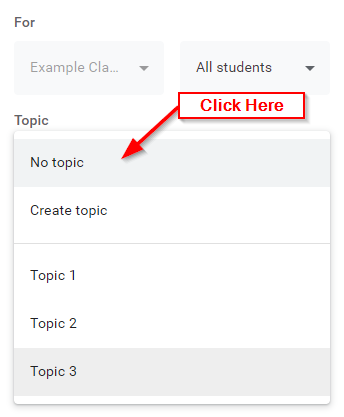
- Assign the Material to a Topic
The topic selection is on the right-hand side of the screen. Once you have clicked on the drop-down box for the topic you can select the topic you would like to add this class material too.
- You can add or create files for the material while posting by clicking the Add or Create button.

- Click Post to decide when you would like to publish this content.
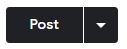
- Select Post, Schedule, Save or Discard
Post – Post the content to your class immediately
Schedule – Schedule the content to appear in the class at a later date
Save Draft – You have not finished editing it and will come back later
Discard Draft – Delete this class material
Step 4 – Adding Students
There are two methods of adding students to your class and they are:
- Invitation Code
- Email Invitations
Sharing the invitation code
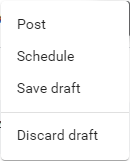
You’ll find the class code on the Stream page. It’s right under the class name and you can click the box next to it to copy it.
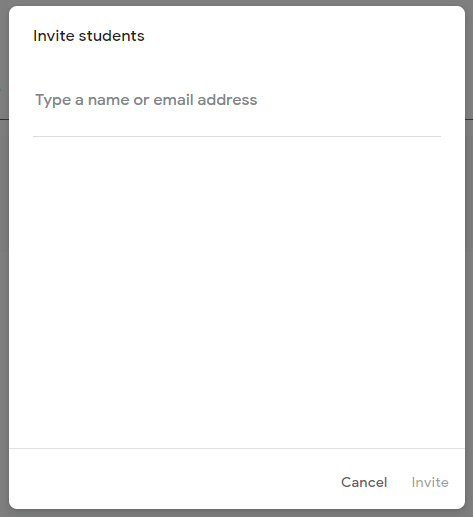
Invite via email
- Go to the People page
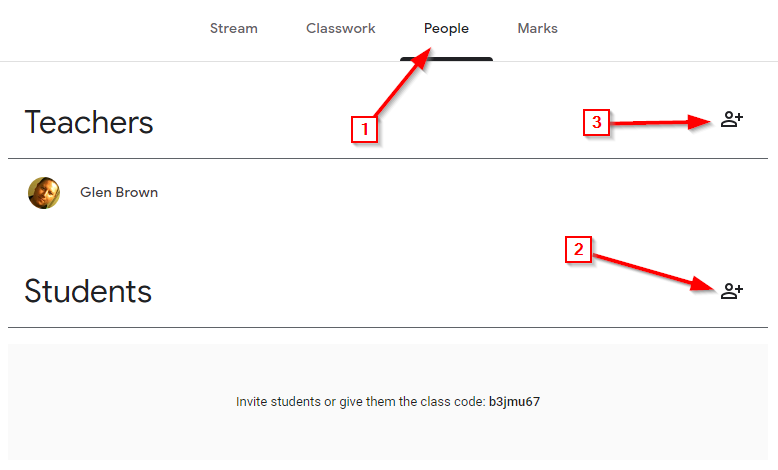
- Click on the add button on the students section
- (Optional) You can add other teachers in the same way
- And finally, just add a Name or Email to add them to your class.
Note: It looks for these names and email addresses in your Google address book. You can add any other email address though.
Your students will get an email. They will join the class as soon as they confirm the joining invitation.
Step 4: Communication
The Stream page is similar to social media where you can post messages to the stream in chronological order. A teacher can put announcements about events that happen during the course like exams, class routines, assignment updates, and so on.
Everything that a teacher publishes for the students is visible in the stream page for both the teacher and the students. This is how students can keep up to date with what is happening in the class.
Besides announcements about what a teacher has done about course materials and assignments. The Stream page also allows posts and comments for discussion within the classroom. You can post something like a tweet and share it with your class. The students can then respond to it by commenting.
Every assignment, quiz, course material updates are automatically posted in the Stream page. A corresponding Google Calendar Event is also created for anything with a date attached. Students can communicate by commenting on each post.
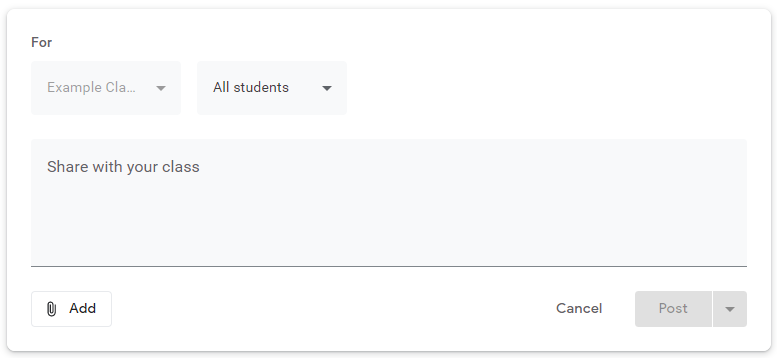
How to share posts and announcements:
- Go to the Stream page of your class
- Click the box that says Share something with your class
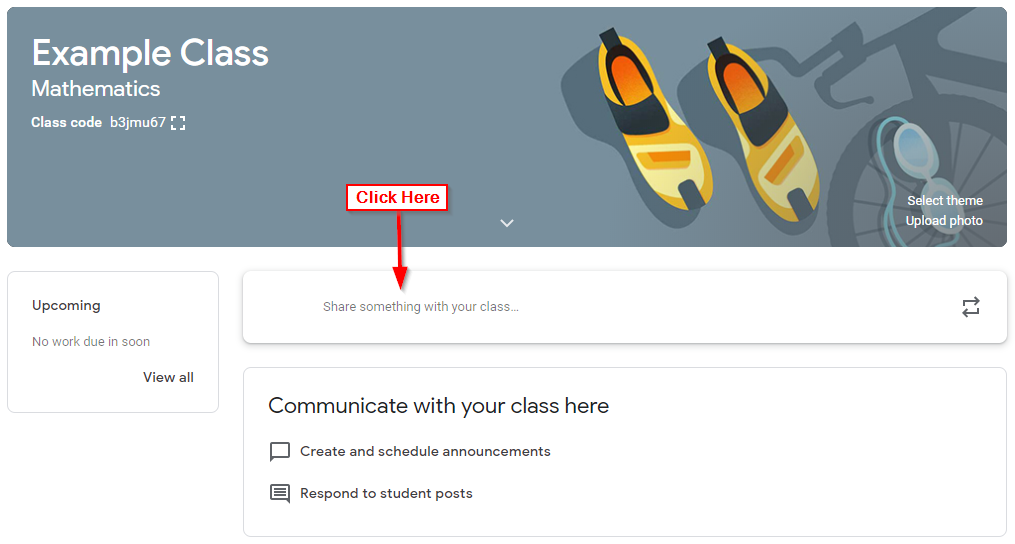
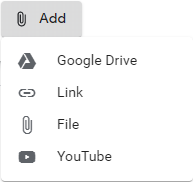
- Then you can add your new stream message and decide who you want to see it and as well as add attachments.
Here are the attachment types you can have.
- You can then click Post to publish it immediately. Alternatively, you can Save it or Schedule it to be posted later.
Step 5: Understanding Assessment
Google Classroom provides three types of tools to evaluate your students. All of them can have points or marks allocated to them. The points then can be used to create a grade sheet and analyze a student’s performance. You can impose time limits for submission of every type.
The types of Assessment are:
- Assignment
The simplest form of assessment is an assignment. You can ask any type of question and get the assignments submitted in any file type you want. However, you do have the ability to mark and highlight parts of pdf and document type assignments. This is great for formative types of assessment where the student is still learning a subject.
You can assign or create a Rubric for a better evaluation of the assignment. You can also reuse an old rubric from another assignment.
- Quiz Assignment
This assessment type allows you to use Google Forms to create quizzes or online exams.
A corresponding Google Form is created for each Quiz Assignment. This means you can use all the Google Form question types.
As above you can assign or create a Rubric for this assessment as well.
Quiz Assignments are great for formative assessment as you are teaching the class to check for understanding and what material may need to be reviewed. Alternatively, you could use it for your final summative assessment.
- Question
A teacher can ask a question and allow students to answer them. Students can give a short answer or a multiple-choice answer to the question. Questions don’t allow you to use Rubrics for marking.
One nice feature is that questions allow students to comment meaning they can discuss the question and what answers the other students replied with.
How to Create an Assignment:

- Go to Classwork page
- Click Create
- Select Assignment
- Fill in the details, add points, and rubrics if you need to as per the steps on the image below.
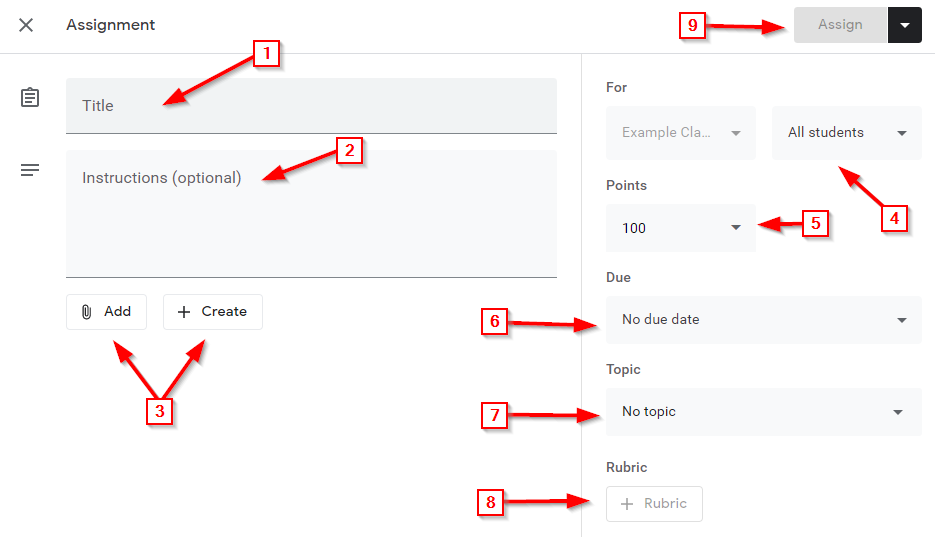
- You can then click Once done, click Post to publish it immediately. Alternatively, you can Save it or Schedule it to be posted later.
How to Create a Quiz Assignment

- Go to Classwork page
- Click Create
- Select Assignment
- Fill in the details just like for the assignment above but now notice there is a google form attached.
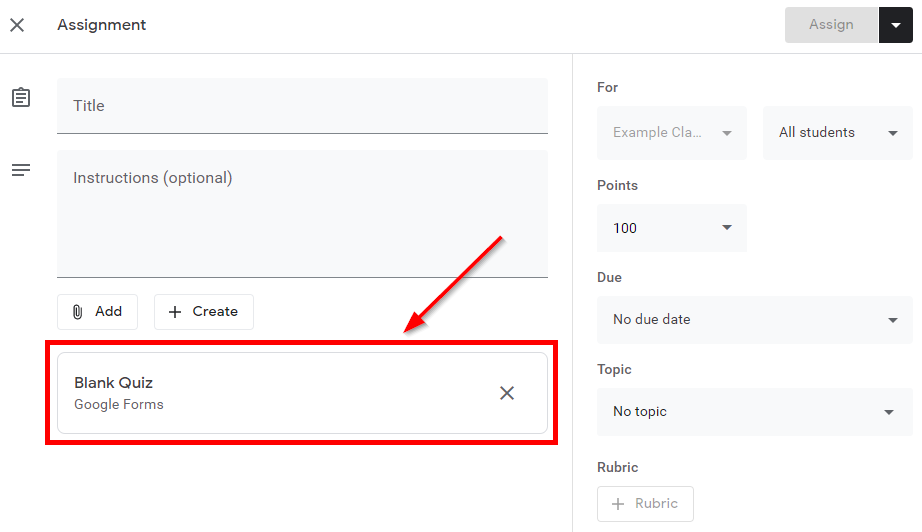
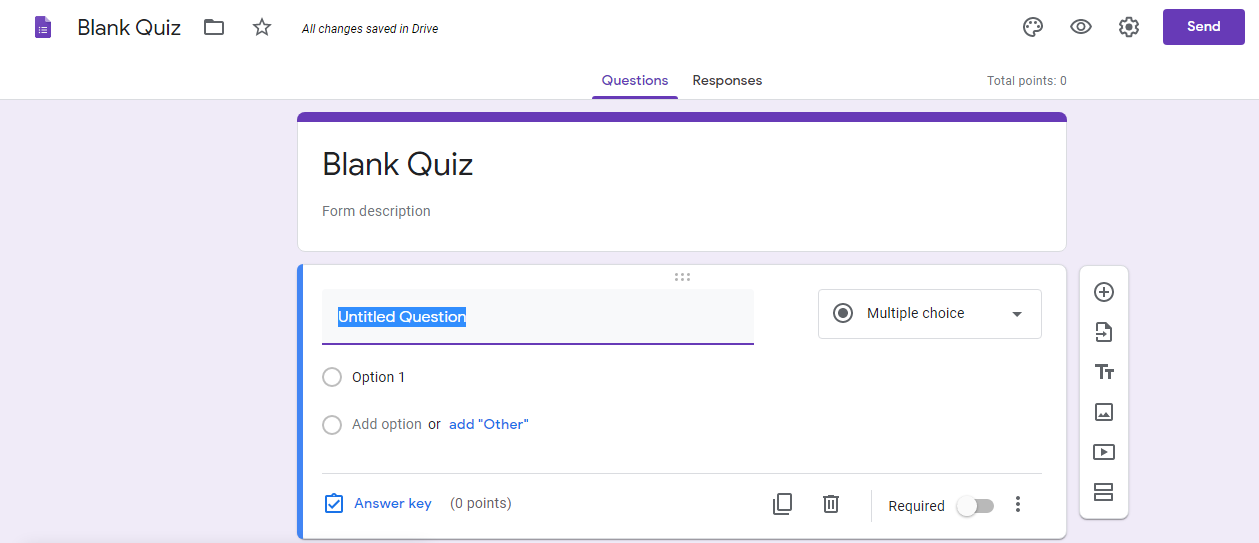
- Edit the Google Form to add the questions for your quiz.
- You can then click Once done, click Post to publish it immediately. Alternatively, you can Save it or Schedule it to be posted later.
NOTE: When you first use google forms a prompt for a tour will come up. Also, note that the quiz will be public by default and if you only want that for your class to see then change the visibility settings.
How to ask a Question
- Go to Classwork page
- Click Create
- Select Question
- Fill in the details exactly like for the other assessment types.
- You can then click Once done, click Post to publish it immediately. Alternatively, you can Save it or Schedule it to be posted later.
Step 6: Grade analysis
Google Classroom provides both individual and overall grade sheets of the students of your class. You can look at student’s grades quickly by using the Grades page. Google Classroom also allows you to export the grade sheets as Google Sheets file. From that file, you can do all kinds of analysis like a normal excel file.
Google Classroom offers 3 types of overall Grading methods. They are :
- No overall grade
- Total points grading
An overall grade is calculated for you by dividing the total points a student earns by the total points possible in the class. You can create grade categories and set point values for classwork in each category. - Weighted by category grading
You assign weights (percentages) to grade categories, and an overall grade is calculated for you. This system calculates as follows:- Finds a student’s average for a category.
- Multiplies each category’s average by its weight (as a decimal) giving category scores.
- Adds the category scores for an overall grade out of 100%.
The types of Grading in Google Classroom is discussed further in this article.
ARTICLE: Grading In Google Classroom: What Teachers Should Know
How to set up Grading in Google Classroom
- Go to Settings

- Scroll down to the Marking Section(In some cases it might be marked as Grading Section)
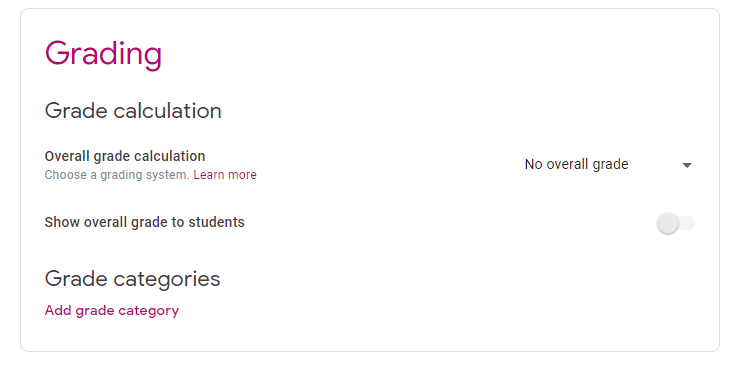
- As discussed earlier, you can set 3 types of grades here.
No overall grading
Leave the Grading page as it is and click Save.
Total points grading
- Click No overall grade
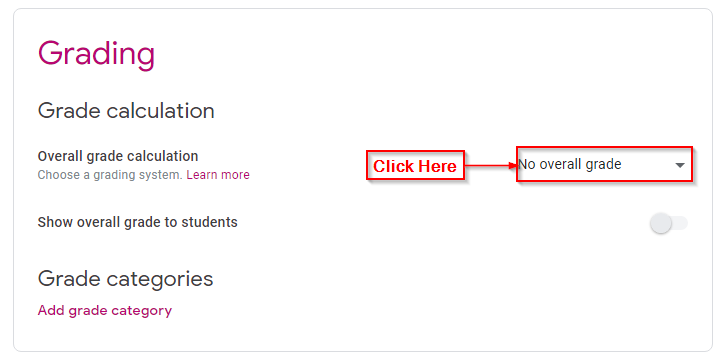
- Select Total points

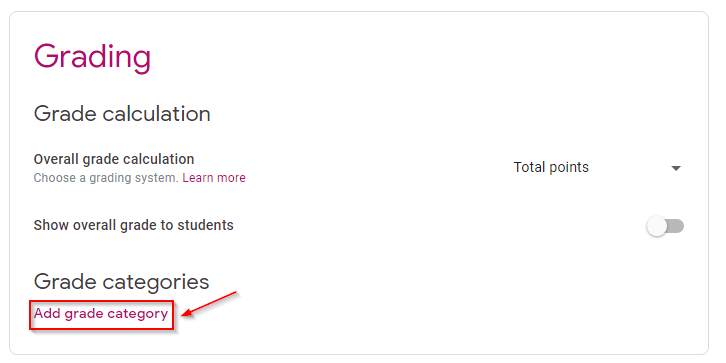
- Click Add grade category
- Give the category a title
- Define total points

Weighted by category grading
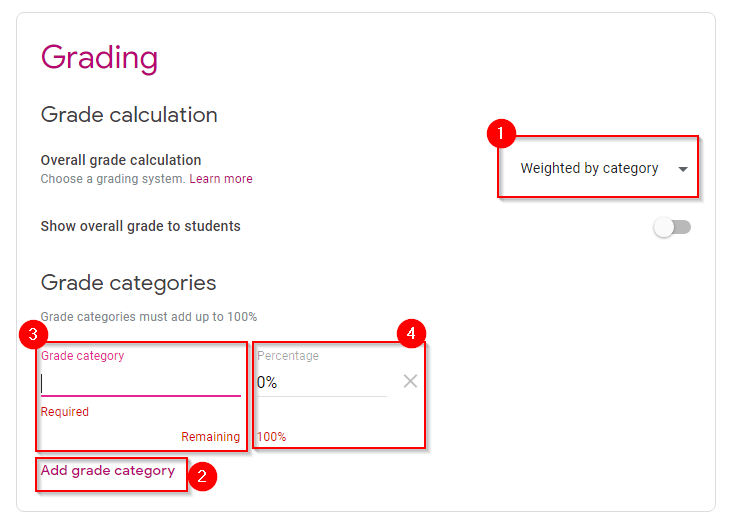
- Click No overall grade
- Select weighted by category
- Add grade category
- Specify the percentage
- Click Save
Advanced Topics
Once you get used to operating Google Classroom you can always use the extra functionality it offers. For example
- Mobile app
You can use the Google Classroom mobile app to manage your class on the go. The mobile app supports a lot of features that you can use without having a computer. It is available on Android and iOS for both Teachers and Students.
- Add ons
Google Classroom supports a wide variety of add ons. They enhance the user experience and add greater functionality. Be sure to check them out on the link below.
LINK : Google Classroom Add Ons
Conclusion
The full process will vary from person to person. You will have to adjust according to your course plan and grading methods. But after going through these steps a few times you will be a pro at using Google Classroom.
TIP: Don’t forget to bookmark this page to use as a reference for later.