
Have you ever wondered how to do Live Video with Google Classroom? This article will walk you through the steps to do just that. Whether it is one on one or group classroom style they are both available for you.
How to Do a Live Video With Google Classroom? To start a live video with Google Classroom you have to perform the following steps:
- Go to the Classwork section
- Open Google Calendar
- Schedule an event
- Enable the Google Meet feature
- Conduct the video call
Now you know what the steps to create a live video classroom session are. Let us take an in-depth look at each step and the features of using video calls during the classes.
Go To The Classwork section
Here are the steps to get to your Classwork Section:
- Log into your Google Classroom.
- Select your class you wish to conduct Video
- You are now in your Class Stream, select the Classwork tab.

Open Google Calendar
Your classroom is natively compatible with various Google extensions, such as:
- Google Calendar
- Hangouts Meet
- Google Drive
- And more
This way you are always covered when it comes to different features needed. For example, Google Calendar allows you to schedule events and reminds the students about their tasks’ deadlines. It is a good way to organize assignments, exams, and events in your classroom.
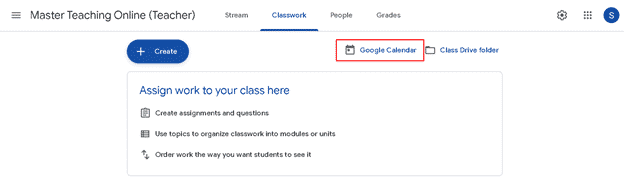
To access Google Calendar from your Classwork section, click on the calendar icon on the right side of the page.
Schedule An Event
After setting up your Google Calendar you can see all the tasks scheduled that you are involved in. It is a good method to keep track of your appointments and meetings. You can sort the events by date, hour, and purpose. The menu on the left side of the page allows you to choose what calendars you want to synchronize.
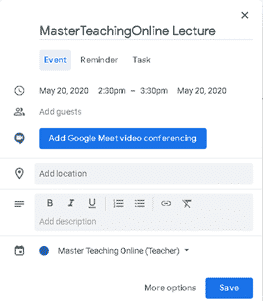
To create a new event, all you have to do is click anywhere on the calendar. A small window will pop-up and guide you throughout the entire process. This window is commonly named ‘The Event Wizard’. This feature helps you edit certain details about your event, such as:
- Title
- Time
- Guests
- Google Meet feature
- Location
- Description
- Synchronized calendar
- More options
Enable The Google Meet Feature
To enable the Google Meet feature, you have to perform the following steps:
- Fill the information required
- Press the ‘Add Google Meet video conferencing’ button
- Provide your students the link to the video call
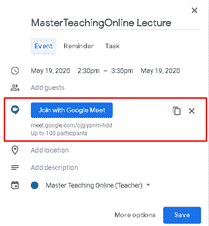
A unique URL will be generated for the video conference. You can manually share this link with your students. However, the URL will also appear on the event details in the calendar.
The video conference is limited to 100 participants. To join the video conference, click on the generated link. You can also join the video call by clicking the ‘Join with Google Meet’ button.
Conduct The Video Call
Setting Up The Hardware
To be able to use all the features that Google Meet provides, make sure that you have the appropriate hardware. You need a working webcam (integrated or not) and a functional microphone. To allow Google Meet to use your camera and microphone, follow the next steps:
- Go to the URL box
- Click on the camera icon
- Allow Google Meet to use your microphone and camera

Teacher Or Student
Google Meet will prompt you to select whether you are a teacher or a student. At this point, you have two options: if you are a student click the ‘Join now’ button; if you are a teacher, click the ‘Present’ button.
The student layout allows them to see what the teacher presents. This interface features a menu that includes different functions, such as:
- Meeting details (link, attachments, guests)
- Control panel (Mute/Unmute, Leave call, Enable/Disable camera)
- Caption control
- The ‘Present now’ button (requests permission to become a presenter)
- Other features (full screen, settings, report a problem, help)

The teacher (presenter) interface is as simple as the student interface. At first, the teacher must select what parts of the screen to share with the students. The presenter can choose to share the entire screen, a certain window, or a certain Google Chrome file.
During a Google Meet video call, the teachers can also share their webcam as well as using voice chat to communicate efficiently with the students.
Permanent Live Video Classroom
To avoid working with multiple URLs, you can create one live video classroom. You can use this video call as your classroom throughout the entire year. To achieve this you must follow these steps:
- Configure a Google Meet call
- Integrate it into your classroom
- Inform your students
Configure a Google Meet Call
First of all, you have to create a video conference on Google Meet. You can do this by following the steps mentioned above (Schedule an event & Enable the Google Meet feature). You can also create a video call directly using the Google Meet extension.
All you have to do in order to configure the Google Meet call is to:
- Go to https://meet.google.com
- Press the ‘Start a meeting’ button
- Copy the invitation link
To integrate this conference call into your classroom, you need to copy the invitation link. You can do so by clicking on the ‘Meeting details’ section and choosing ‘Copy joining info’. At this point, the invitation code is copied into your clipboard and you can paste it anywhere you want.
Integrate It Into Your Classroom
To integrate the permanent live video call into your classroom, follow the next steps:
- Go to your class
- Access the ‘Classwork’ section
- Press the ‘Create’ button
- Select the ‘Material’ feature
- Enter specific information
Choose an intuitive title (for example ‘Live Virtual Classroom’) so that the students will find the video call more easily. Then, click the paperclip icon (‘Add’) and select the ‘Link’ feature. Paste your video call invitation link into the designated box and click ‘Add’.
The description should contain an explanation for the students. You should tell them that this is what they have to access every time an event is scheduled for the class. Make any desired modifications to the material description and then press the ‘+ Create’ button.
At this point, you have linked your Google Meet video conference to the classroom. Whenever you have a lesson scheduled, the students will click on the link provided and connect to the Google Meet video call. This is an easy way to make sure that every student can easily find the live video session.
Inform Your Students
Now it’s time to keep the students updated in matters of live video classes. Explain to them the entire process of joining the video conference to prevent any misunderstanding during the educational process. Maybe ask them to check their Google Calendar constantly to be updated regarding the scheduled lessons.
Whenever a new lesson is scheduled, all they have to do is to access the classroom on Google Classroom and join the meeting using the link provided. The advantage of using a permanent URL is that you don’t have to share a different link every time you have to conduct an online class. This avoids the students getting confused and makes the learning process more proficient.
Why Use The Video Call Feature On Google Classroom
There are many features of using a video and audio chat during classes taking place on Google Classroom. The most noteworthy features are:
- Clear instructions
- Interactive lessons
- Better communication
- Cheating prevention
Clear Instructions
When you assign a task to the students they may need additional directions to complete the task in accordance with your requirements. By using the video call feature, you can explain to them anything that is unclear. You can give instructions and provide them with directions to fulfill your expectations.
Interactive Lessons
Seeing your students while teaching them helps you make sure that they are paying attention to your class. If you are not able to see them, they might as well leave the room while you are lecturing the lesson.
Additionally, when you and your students are able to see each other you can work more effectively. Having video capabilities integrated within the online classroom makes every individual involved like the lesson is taking place in a physical classroom.
Better Communication
Let’s face the truth: it is easier for any of us to talk than to write. Considering this, if you see and hear your students, it is a simpler task for you to understand their questions and ideas. Written text may be misunderstood or misinterpreted.
The ability to talk with your students in real-time helps you figure things out faster. This is a consequence of the fact that most people don’t have advanced typewriting skills. This way, you can answer their questions and they acknowledge the material faster.
Cheating Prevention
Using the video call feature on Google Classroom you can prevent the students from cheating during exams. You can see if the student uses forbidden materials or uses his phone to find the answers for the test through watching their video feed. Or maybe you just ask them the questions verbally and you can see they are the ones answering.
However, this method does not prevent the students from using software installed on their computer but at least you can see that it is them doing it.
